

Only apply small quantities of diluted glue on the sides of parts, like shown on picture.

Use a needle inserted in a half cut Chinese chopstick, it makes a great glue applying tool. (the pointed side of the needle inserted in the chopstick)

Billy's house kit assembly
tips
1.
|
For the veneer parts; Cutting the parts from the cardboard side makes the job easier. | |
Only apply small quantities of diluted glue on the sides of parts, like shown on picture. |
|
Use a needle inserted in a half cut Chinese chopstick, it makes a great glue applying tool. (the pointed side of the needle inserted in the chopstick) |
|
When assembling the first wall, hold in place for a few seconds, 30 or 40 secs should do. |
2.
 |
For the second wall, again hold in place for a few seconds. |  |
Verify that the corners of the 2 walls are well aligned. Use a micro clamp if the walls are not strait, but it shouldn't be necessary. |
 |
Turn the part in all directions to verify alignment. At this stage, curvy walls wont affect the end result. |
 |
Seal the joints with a bead or 2 of diluted glue. |
3.
 |
Snap in place the second floor, by following the right sequence number. Be sure both walls are glue dried before doing this. |  |
push with thumb |
 |
Another view to see the end result. This is very doable, and I never had broken any parts doing this, you just have to take your time. |
 |
install third wall, by using the same principles discuss earlier. |
3.
 |
Always remember to do a test fit before gluing. use your glue applicator to orient the tabs of the floor into the tab holes of the fourth wall. |  |
Mix your paint as described in the manual, and stain all walls. |
 |
All parts will warp after paint, but let them dry for an hour and they pretty much return to their original states. Why? Those are not made of plywood but simple maple ply veneer with cardboard. The wood does not react the same way as plywood, plywood WILL stay warped, contrary to this type of veneer. |
4.
 |
See here, when the parts are dried , they are mostly all flat. No stress here. |
 |
Stain the bottom walls, no need to be precise here, frames will hide the mistake, just don't overpass too much. For the windows you can wait until the frames are glued in place. |
 |
Stain parts directly on the sprue. |
 |
Same for the veneer parts. But don't use floquil paint or even acrylic primer, otherwise parts will stick on the sprue. |
5.
 |
Painting the windows frame directly is much to hard, wait until the frames are glued on. |
 |
Once the frames are detach, paint the side of the frames, use a silicon paper. (Like the back paper from Avery's stickers labels) |
 |
Use the same tool to apply glue, and center each frame in widows opening. |
 |
use the flat end of your tweezer and press a little for a few seconds to flatten the window frame. |
6.
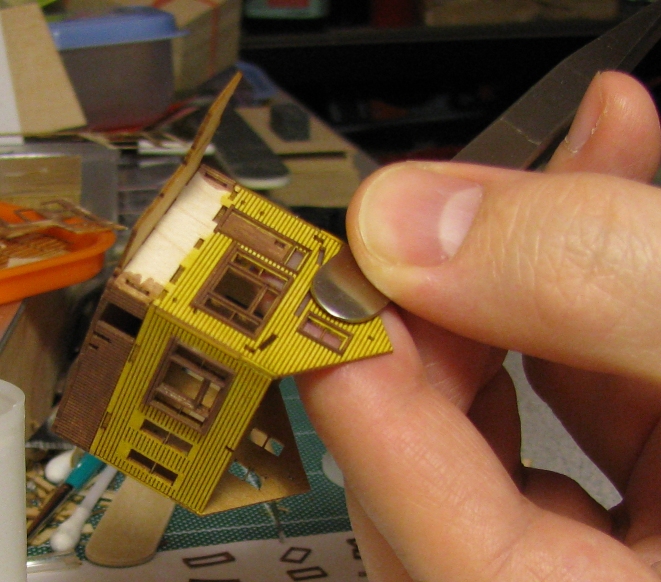 |
Same technique for the smaller frames. |
 |
All windows frames are glued. |
 |
Here
is a nice idea to hold the house wile working on it. |
 |
Now paint all inside frames using the exterior frames as guides. |
7.
 |
All interior frames are painted. |
 |
Ply the window sheet as describe in the manual. Do a pyramid shape and insert into the house |
 |
Use tweezers to place corectly the plasctic window. |
 |
The plastic cell should contact all 4 walls corectly, verify orientation, before putting a bead of non diluted white glue in each holes. |
8.
|
Insert the reinforcing wall with the diagonal beam. Be carfull not to break the wall, again take your time. You could use a micro clamp and gently squeeze the back and front walls into the beam taps. |
 |
Another view of the wall and beam. |
 |
Each beads of glue acts as a rivet, and hold the plastic cell in place. Once dried they become invisible. |
 |
File the taps on the porch parts, test fit and glue in place. |
9.
|
Hold everthing in place for a few seconds. |
 |
Insert both porch sidings, they should snap in there easily, so file the taps if necessary. |
 |
Roof
painting:
|
 |
After 35 min the wood prety much come back strait, without any help. |
10.
 |
Porch
beam assembly: |
 |
Use the end section of your tweezers to insert the tiny posts sections. |
 |
Follow those steps for ease of assembly |
11.
 |
Here we see the 3 posts being completed. |
 |
Align the 2 sided posts and apply glue to them, glue also the porch roof beam and the taps inside the house.. |
 |
Here's another view under the porch roof. |
 |
Install the side fences following the sequence explain in the manual. |
12.
 |
Here, be very carefull and use all your remaining patiences, those fences are the most fragile parts in the kit. When done, paint all part that need touch-up |
 |
Install the 3 pieces to create the roof dormer. Glue and once dry, put the tiny window cell in before putting the roof. |
 |
Here we see that the roof on the dormer window is installed, and sidings to hide the walls alignement taps are put in, plus the chimney is glued. |
12.
 |
Final
words; Now, if I can only find where
I had put the little square siding I had put aside in the beginning?!? |
THE END |

